Discover the best DMC FZ300 setting for shutter speed for northern lights, plus ISO and exposure tips to capture stunning aurora photos.
The ideal DMC FZ300 setting for shutter speed for northern lights is typically 5–15 seconds using Manual mode with f/2.8 aperture and ISO between 800–1600. Shorter exposures work best for fast-moving auroras, while longer exposures capture faint lights more clearly.
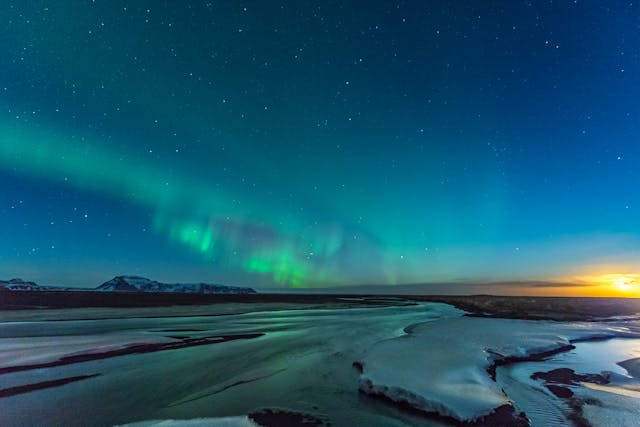
The first time I tried photographing the northern lights, I thought something was wrong with my camera.
The sky looked black. Completely empty. Yet people around me kept pointing upward, whispering excitedly. I pressed the shutter anyway, waited about ten seconds, and then looked at the screen.
Suddenly there it was.
A faint green ribbon stretching across the sky like someone had brushed neon paint across the darkness.
That moment taught me something important: aurora photography isn’t about what your eyes see, it’s about what your camera collects over time.
And that’s exactly where shutter speed becomes the star of the show.
If you’re using the Panasonic Lumix DMC-FZ300, you’re probably wondering what shutter speed actually works for capturing the northern lights. Bridge cameras behave a little differently than large sensor cameras, so dialing in the right exposure can feel like guesswork at first.
But once you understand the rhythm of the aurora, and how shutter speed interacts with light, the process becomes surprisingly intuitive.
Let’s walk through it together.
What You'll Discover:
Why Shutter Speed Matters for Northern Lights
The northern lights are constantly moving.
Sometimes slowly. Sometimes wildly.
Think of the aurora like glowing smoke drifting across the sky. If your shutter stays open too long, that movement blurs into a soft green haze. If your shutter closes too quickly, the camera barely captures any light at all.
Shutter speed controls how long the camera gathers light from the sky.
Too short, and the image is dark.
Too long, and the aurora loses shape.
Most photographers eventually discover that the sweet spot lies somewhere between 5 seconds and 15 seconds.
That small window is where the magic usually happens.
A simple rule of thumb emerges:
Fast aurora → shorter shutter speed.
Faint aurora → longer shutter speed.
Understanding this rule alone improves most aurora photos instantly.
DMC FZ300 Setting for Shutter Speed for Northern Lights
Let’s start with a reliable baseline configuration. These settings work in the majority of aurora situations and give you a strong starting point for experimentation.
Basic Starting Settings
Camera Mode: Manual (M)
| Setting | Recommended Value |
| Shutter Speed | 5–15 seconds |
| Aperture | f/2.8 |
| ISO | 800–1600 |
| Focus | Manual / Infinity |
| White Balance | Auto or 3500–4000K |
The reason these settings work well is simple.
The FZ300 lens opens to f/2.8, which allows a good amount of light into the camera. Pair that with a 10-second exposure and moderate ISO, and the sensor gathers enough light to reveal the aurora.
From there, you adjust based on the brightness and movement of the sky.
Adjusting Shutter Speed Based on Aurora Strength
Aurora conditions change constantly. Sometimes the sky barely glows. Other nights it dances wildly across the horizon.
That means the best DMC FZ300 shutter speed for northern lights isn’t a fixed number.
It’s a flexible range.
Weak Aurora Activity
When the aurora is faint or barely visible to the naked eye, you need to gather more light.
Recommended settings:
- Shutter Speed: 12–15 seconds
- ISO: 1600
- Aperture: f/2.8
Longer exposures allow the sensor to collect faint colors that the eye struggles to detect.
The downside? Slight motion blur in the aurora. But in this case, brightness matters more.
Moderate Aurora
This is the scenario most photographers experience.
The aurora is clearly visible but not exploding across the sky.
Recommended settings:
- Shutter Speed: 8–10 seconds
- ISO: 800–1200
- Aperture: f/2.8
This range balances brightness and detail beautifully.
Many aurora images you see online are captured right here.
Strong Dancing Aurora
On powerful aurora nights, the sky moves quickly.
Bright streaks ripple and twist overhead.
If you keep a long exposure here, the details blur together. The shapes vanish.
Recommended settings:
- Shutter Speed: 3–6 seconds
- ISO: 800–1000
- Aperture: f/2.8
Shorter shutter speeds freeze the motion and preserve the dramatic shapes.
Ironically, brighter auroras require faster shutter speeds.
Why the Panasonic FZ300 Works Surprisingly Well for Aurora
At first glance, the Lumix FZ300 doesn’t seem like an astrophotography camera.
It has a smaller sensor compared to many DSLR or mirrorless models.
Yet it still performs well for northern lights photography because of a few hidden advantages.
Constant f/2.8 Lens
The FZ300 maintains f/2.8 aperture throughout the entire zoom range. This means you never lose light while adjusting focal length.
For night photography, that consistency is incredibly useful.
Long Exposure Control
The camera allows shutter speeds up to 60 seconds in manual mode, giving photographers plenty of control for night exposures.
Aurora photography rarely needs exposures that long, but the flexibility helps when conditions are extremely dark.
Strong Manual Controls
Unlike many compact cameras, the FZ300 provides full manual exposure adjustments. That means you can easily balance shutter speed, ISO, and aperture without fighting automatic settings.
For aurora photography, manual control is essential.
The Small Setting That Changes Everything
There’s one tiny mistake that ruins many northern lights photos.
Camera shake.
When you press the shutter button during a long exposure, even the slightest vibration becomes visible in the final image.
The fix is surprisingly simple.
Use a 2-Second Timer
Instead of triggering the shutter instantly, enable the 2-second self timer.
Press the shutter button. Step back.
The camera stabilizes before the exposure begins.
This small trick dramatically improves sharpness.
Comparison: Shutter Speed vs Aurora Conditions
Here is a quick reference table you can use in the field.
| Aurora Strength | Shutter Speed | Result |
| Weak aurora | 12–15 sec | Brighter exposure |
| Moderate aurora | 8–10 sec | Balanced detail |
| Active aurora | 5–7 sec | Sharp structure |
| Fast dancing aurora | 3–5 sec | Frozen motion |
Think of it like a sliding scale.
Brighter aurora → faster shutter speed.
Fainter aurora → longer exposure.
Other Camera Settings That Influence Shutter Speed
Shutter speed works together with two other exposure settings.
Photographers often call this relationship the exposure triangle.
Understanding it makes aurora photography far easier.
Aperture
The FZ300’s widest aperture is f/2.8, and that’s exactly where you want it.
A wide aperture allows more light to reach the sensor. Closing the aperture would make the image darker and force you to increase shutter speed.
For northern lights, keep it wide open.
ISO
ISO determines how sensitive the camera sensor is to light.
Typical ISO values for aurora photography:
- ISO 800
- ISO 1000
- ISO 1600
Higher ISO brightens the image but introduces digital noise.
Finding the balance is key.
Focal Length
Wide-angle shots work best for aurora photography.
They allow longer exposures before stars begin to trail across the sky.
With the FZ300, shooting near the wide end of the zoom gives the most natural results.
Common Mistakes When Photographing the Northern Lights
Even experienced photographers fall into these traps.
Using Shutter Speeds That Are Too Long
Many beginners assume longer exposures always improve night photos.
But with auroras, long exposures blur the movement.
The result looks like green fog instead of flowing light.
Keeping ISO Too Low
ISO values like 100 or 200 work well during daylight.
At night they make aurora photos extremely dark.
Aurora photography needs higher ISO values.
Autofocus Struggling in Darkness
Autofocus systems often hunt endlessly in dark environments.
Manual focus set to infinity eliminates this problem.
Not Using a Tripod
This mistake is surprisingly common.
Even slight hand movement during a 10-second exposure causes blur.
A tripod is absolutely essential.
A Simple Workflow for Shooting Aurora with the FZ300
Many photographers follow a routine like this when they arrive at an aurora location.
Step 1
Switch the camera to Manual Mode.
Step 2
Set initial values:
- Aperture: f/2.8
- ISO: 800
- Shutter Speed: 10 seconds
Step 3
Take a test shot.
Step 4
Check brightness on the screen.
Step 5
Adjust shutter speed first. Increase or decrease depending on how bright the aurora appears.
Step 6
Fine-tune ISO if needed.
Aurora photography often feels experimental.
But that experimentation is part of the fun.
Every sky behaves differently.
FAQ
What is the best DMC FZ300 shutter speed for northern lights?
Most photographers use 5–15 seconds depending on aurora brightness and movement.
Can the Panasonic FZ300 capture the northern lights?
Yes. With manual settings, a tripod, and correct exposure adjustments, the FZ300 can capture impressive aurora photos.
Should I use manual focus for aurora photography?
Yes. Set focus to infinity so the stars and aurora remain sharp during long exposures.
What ISO works best for northern lights with the FZ300?
Start with ISO 800–1600 and adjust depending on brightness and noise levels.
Do I need a tripod for aurora photography?
Yes. Long exposures require complete camera stability. A tripod prevents motion blur.
Key Takings
- The ideal DMC FZ300 setting for shutter speed for northern lights usually falls between 5 and 15 seconds.
- Faster shutter speeds capture active, dancing auroras without motion blur.
- Longer exposures help reveal faint aurora activity in darker skies.
- Keep the aperture at f/2.8 to maximize light entering the camera.
- Use ISO 800–1600 to balance brightness and image noise.
- Always use manual focus set to infinity for sharp stars.
- A tripod and 2-second timer significantly improve photo clarity.


